What a Deep Neural Network thinks about your #selfie
Convolutional Neural Networks are great: they recognize things, places and people in your personal photos, signs, people and lights in self-driving cars, crops, forests and traffic in aerial imagery, various anomalies in medical images and all kinds of other useful things. But once in a while these powerful visual recognition models can also be warped for distraction, fun and amusement. In this fun experiment we’re going to do just that: We’ll take a powerful, 140-million-parameter state-of-the-art Convolutional Neural Network, feed it 2 million selfies from the internet, and train it to classify good selfies from bad ones. Just because it’s easy and because we can. And in the process we might learn how to take better selfies :)
Yeah, I’ll do real work. But first, let me tag a #selfie.
Convolutional Neural Networks
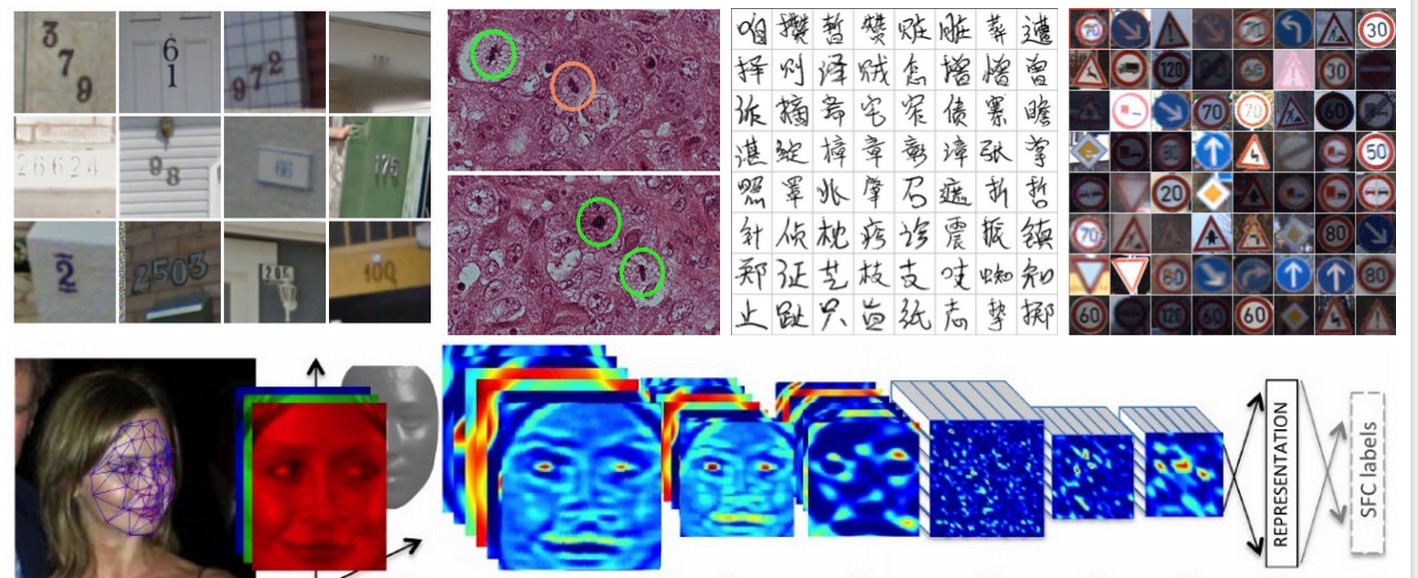
Before we dive in I thought I should briefly describe what Convolutional Neural Networks (or ConvNets for short) are in case a slightly more general audience reader stumbles by. Basically, ConvNets are a very powerful hammer, and Computer Vision problems are very nails. If you’re seeing or reading anything about a computer recognizing things in images or videos, in 2015 it almost certainly involves a ConvNet. Some examples:
A bit of history. ConvNets happen to have an interesting background story. They were first developed by Yann LeCun et al. in 1980’s (building on some earlier work, e.g. from Fukushima). As a fun early example see this demonstration of LeNet 1 (that was the ConvNet’s name) recognizing digits back in 1993. However, these models remained mostly ignored by the Computer Vision community because it was thought that they would not scale to “real-world” images. That turned out to be only true until about 2012, when we finally had enough compute (in form of GPUs specifically, thanks NVIDIA) and enough data (thanks ImageNet) to actually scale these models, as was first demonstrated when Alex Krizhevsky, Ilya Sutskever and Geoff Hinton won the 2012 ImageNet challenge (think: The World Cup of Computer Vision), crushing their competition (16.4% error vs. 26.2% of the second best entry).
I happened to witness this critical juncture in time first hand because the ImageNet challenge was over the last few years organized by Fei-Fei Li’s lab (my lab), so I remember when my labmate gasped in disbelief as she noticed the (very strong) ConvNet submission come up in the submission logs. And I remember us pacing around the room trying to digest what had just happened. In the next few months ConvNets went from obscure models that were shrouded in skepticism to rockstars of Computer Vision, present as a core building block in almost every new Computer Vision paper. The ImageNet challenge reflects this trend - In the 2012 ImageNet challenge there was only one ConvNet entry, and since then in 2013 and 2014 almost all entries used ConvNets. Also, fun fact, the winning team each year immediately incorporated into a company.
Over the next few years we had perfected, simplified, and scaled up the original 2012 “AlexNet” architecture (yes, we give them names). In 2013 there was the “ZFNet”, and then in 2014 the “GoogLeNet” (get it? Because it’s like LeNet but from Google? hah) and “VGGNet”. Anyway, what we know now is that ConvNets are:
- simple: one operation is repeated over and over few tens of times starting with the raw image.
- fast, processing an image in few tens of milliseconds
- they work very well (e.g. see this post where I struggle to classify images better than the GoogLeNet)
- and by the way, in some ways they seem to work similar to our own visual cortex (see e.g. this paper)
Under the hood
So how do they work? When you peek under the hood you’ll find a very simple computational motif repeated over and over. The gif below illustrates the full computational process of a small ConvNet:
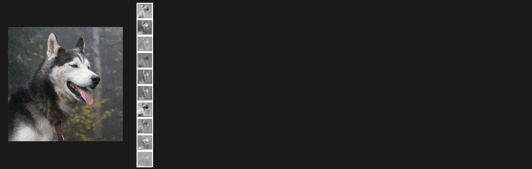
On the left we feed in the raw image pixels, which we represent as a 3-dimensional grid of numbers. For example, a 256x256 image would be represented as a 256x256x3 array (last 3 for red, green, blue). We then perform convolutions, which is a fancy way of saying that we take small filters and slide them over the image spatially. Different filters get excited over different features in the image: some might respond strongly when they see a small horizontal edge, some might respond around regions of red color, etc. If we suppose that we had 10 filters, in this way we would transform the original (256,256,3) image to a (256,256,10) “image”, where we’ve thrown away the original image information and only keep the 10 responses of our filters at every position in the image. It’s as if the three color channels (red, green, blue) were now replaced with 10 filter response channels (I’m showing these along the first column immediately on the right of the image in the gif above).
Now, I explained the first column of activations right after the image, so what’s with all the other columns that appear over time? They are the exact same operation repeated over and over, once to get each new column. The next columns will correspond to yet another set of filters being applied to the previous column’s responses, gradually detecting more and more complex visual patterns until the last set of filters is computing the probability of entire visual classes (e.g. dog/toad) in the image. Clearly, I’m skimming over some parts but that’s the basic gist: it’s just convolutions from start to end.
Training. We’ve seen that a ConvNet is a large collection of filters that are applied on top of each other. But how do we know what the filters should be looking for? We don’t - we initialize them all randomly and then train them over time. For example, we feed an image to a ConvNet with random filters and it might say that it’s 54% sure that’s a dog. Then we can tell it that it’s in fact a toad, and there is a mathematical process for changing all filters in the ConvNet a tiny amount so as to make it slightly more likely to say toad the next time it sees that same image. Then we just repeat this process tens/hundreds of millions of times, for millions of images. Automagically, different filters along the computational pathway in the ConvNet will gradually tune themselves to respond to important things in the images, such as eyes, then heads, then entire bodies etc.
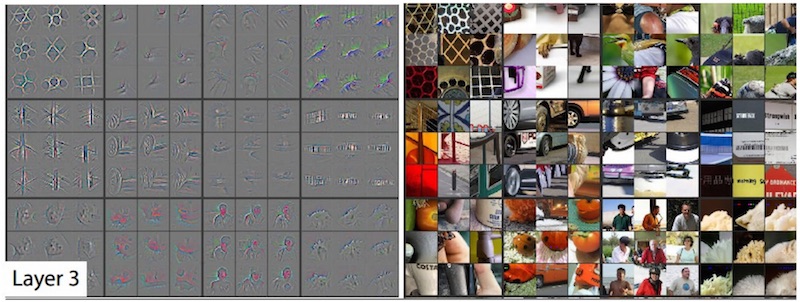
Another nice set of visualizations for a fully trained ConvNet can be found in Jason Yosinski et al. project deepvis. It includes a fun live demo of a ConvNet running in real time on your computer’s camera, as explained nicely by Jason in this video:
In summary, the whole training process resembles showing a child many images of things, and him/her having to gradually figure out what to look for in the images to tell those things apart. Or if you prefer your explanations technical, then ConvNet is just expressing a function from image pixels to class probabilities with the filters as parameters, and we run stochastic gradient descent to optimize a classification loss function. Or if you’re into AI/brain/singularity hype then the function is a “deep neural network”, the filters are neurons, and the full ConvNet is a piece of adaptive, simulated visual cortical tissue.
Training a ConvNet
The nice thing about ConvNets is that you can feed them images of whatever you like (along with some labels) and they will learn to recognize those labels. In our case we will feed a ConvNet some good and bad selfies, and it will automagically find the best things to look for in the images to tell those two classes apart. So lets grab some selfies:
- I wrote a quick script to gather images tagged with #selfie. I ended up getting about 5 million images (with ConvNets it’s the more the better, always).
- I narrowed that down with another ConvNet to about 2 million images that contain at least one face.
- Now it is time to decide which ones of those selfies are good or bad. Intuitively, we want to calculate a proxy for how many people have seen the selfie, and then look at the number of likes as a function of the audience size. I took all the users and sorted them by their number of followers. I gave a small bonus for each additional tag on the image, assuming that extra tags bring more eyes. Then I marched down this sorted list in groups of 100, and sorted those 100 selfies based on their number of likes. I only used selfies that were online for more than a month to ensure a near-stable like count. I took the top 50 selfies and assigned them as positive selfies, and I took the bottom 50 and assigned those to negatives. We therefore end up with a binary split of the data into two halves, where we tried to normalize by the number of people who have probably seen each selfie. In this process I also filtered people with too few followers or too many followers, and also people who used too many tags on the image.
- Take the resulting dataset of 1 million good and 1 million bad selfies and train a ConvNet.
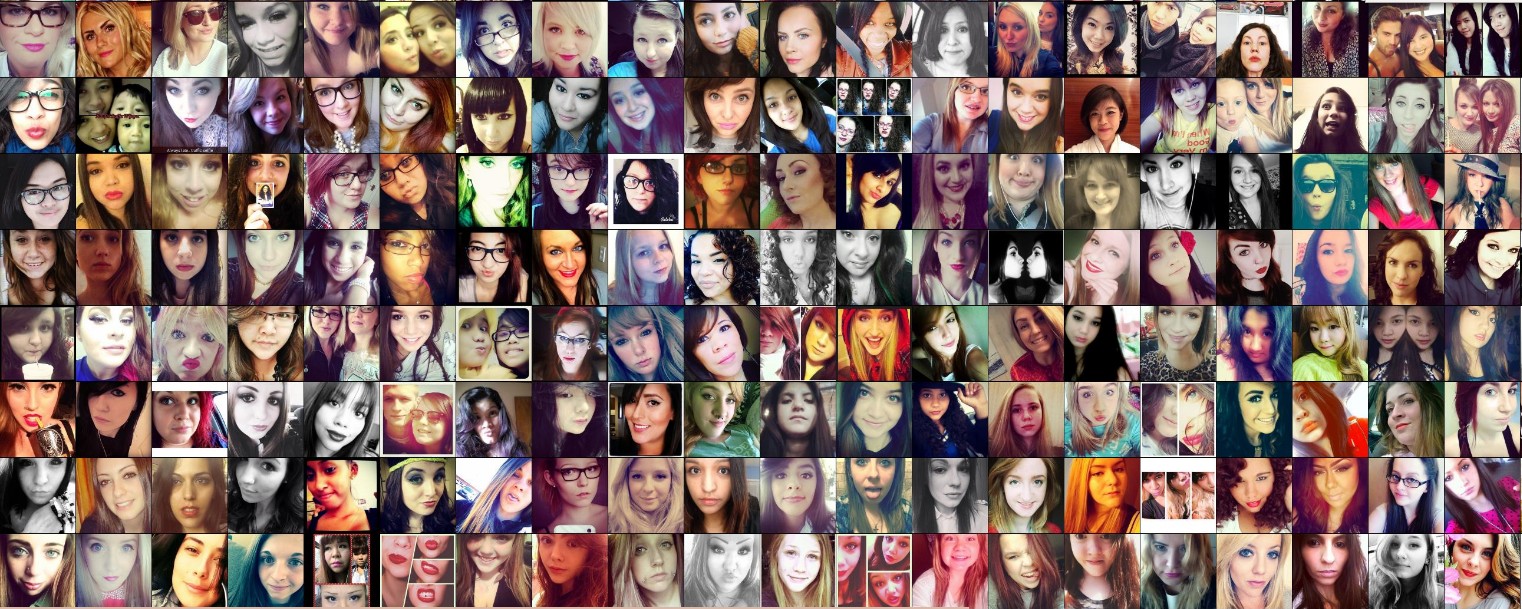
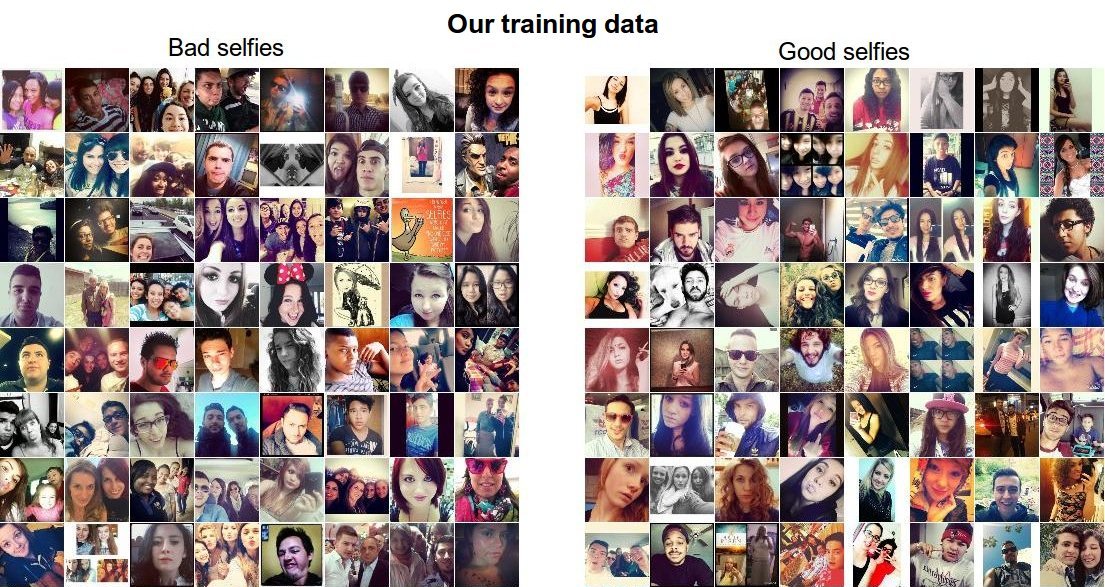
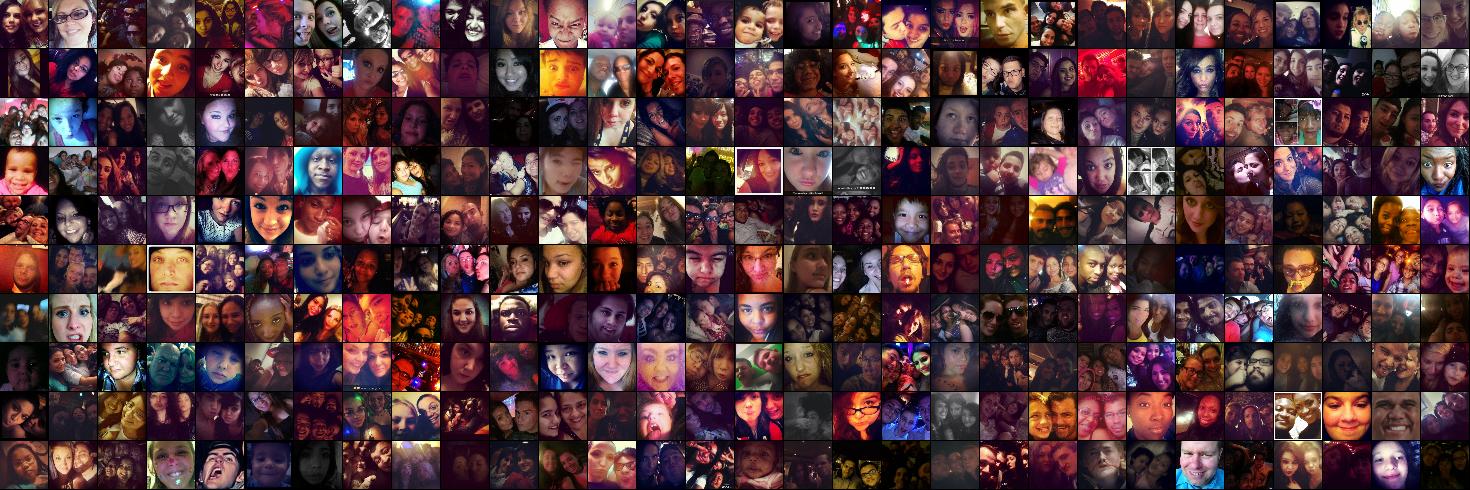
At this point you may object that the way I’m deciding if a selfie is good or bad is wrong - e.g. what if someone posted a very good selfie but it was late at night, so perhaps not as many people saw it and it got less likes? You’re right - It almost definitely is wrong, but it only has to be right more often that not and the ConvNet will manage. It does not get confused or discouraged, it just does its best with what it’s been given. To get an idea about how difficult it is to distinguish the two classes in our data, have a look at some example training images below. If I gave you any one of these images could you tell which category it belongs to?
Training details. Just to throw out some technical details, I used Caffe to train the ConvNet. I used a VGGNet pretrained on ImageNet, and finetuned it on the selfie dataset. The model trained overnight on an NVIDIA K40 GPU. I disabled dropout because I had better results without it. I also tried a VGGNet pretrained on a dataset with faces but did not obtain better results than starting from an ImageNet checkpoint. The final model had 60% accuracy on my validation data split (50% is guessing randomly).
What makes a good #selfie ?
Okay, so we collected 2 million selfies, decided which ones are probably good or bad based on the number of likes they received (controlling for the number of followers), fed all of it to Caffe and trained a ConvNet. The ConvNet “looked” at every one of the 2 million selfies several tens of times, and tuned its filters in a way that best allows it to separate good selfies from bad ones. We can’t very easily inspect exactly what it found (it’s all jumbled up in 140 million numbers that together define the filters). However, we can set it loose on selfies that it has never seen before and try to understand what it’s doing by looking at which images it likes and which ones it does not.
I took 50,000 selfies from my test data (i.e. the ConvNet hasn’t seen these before). As a first visualization, in the image below I am showing a continuum visualization, with the best selfies on the top row, the worst selfies on the bottom row, and every row in between is a continuum:
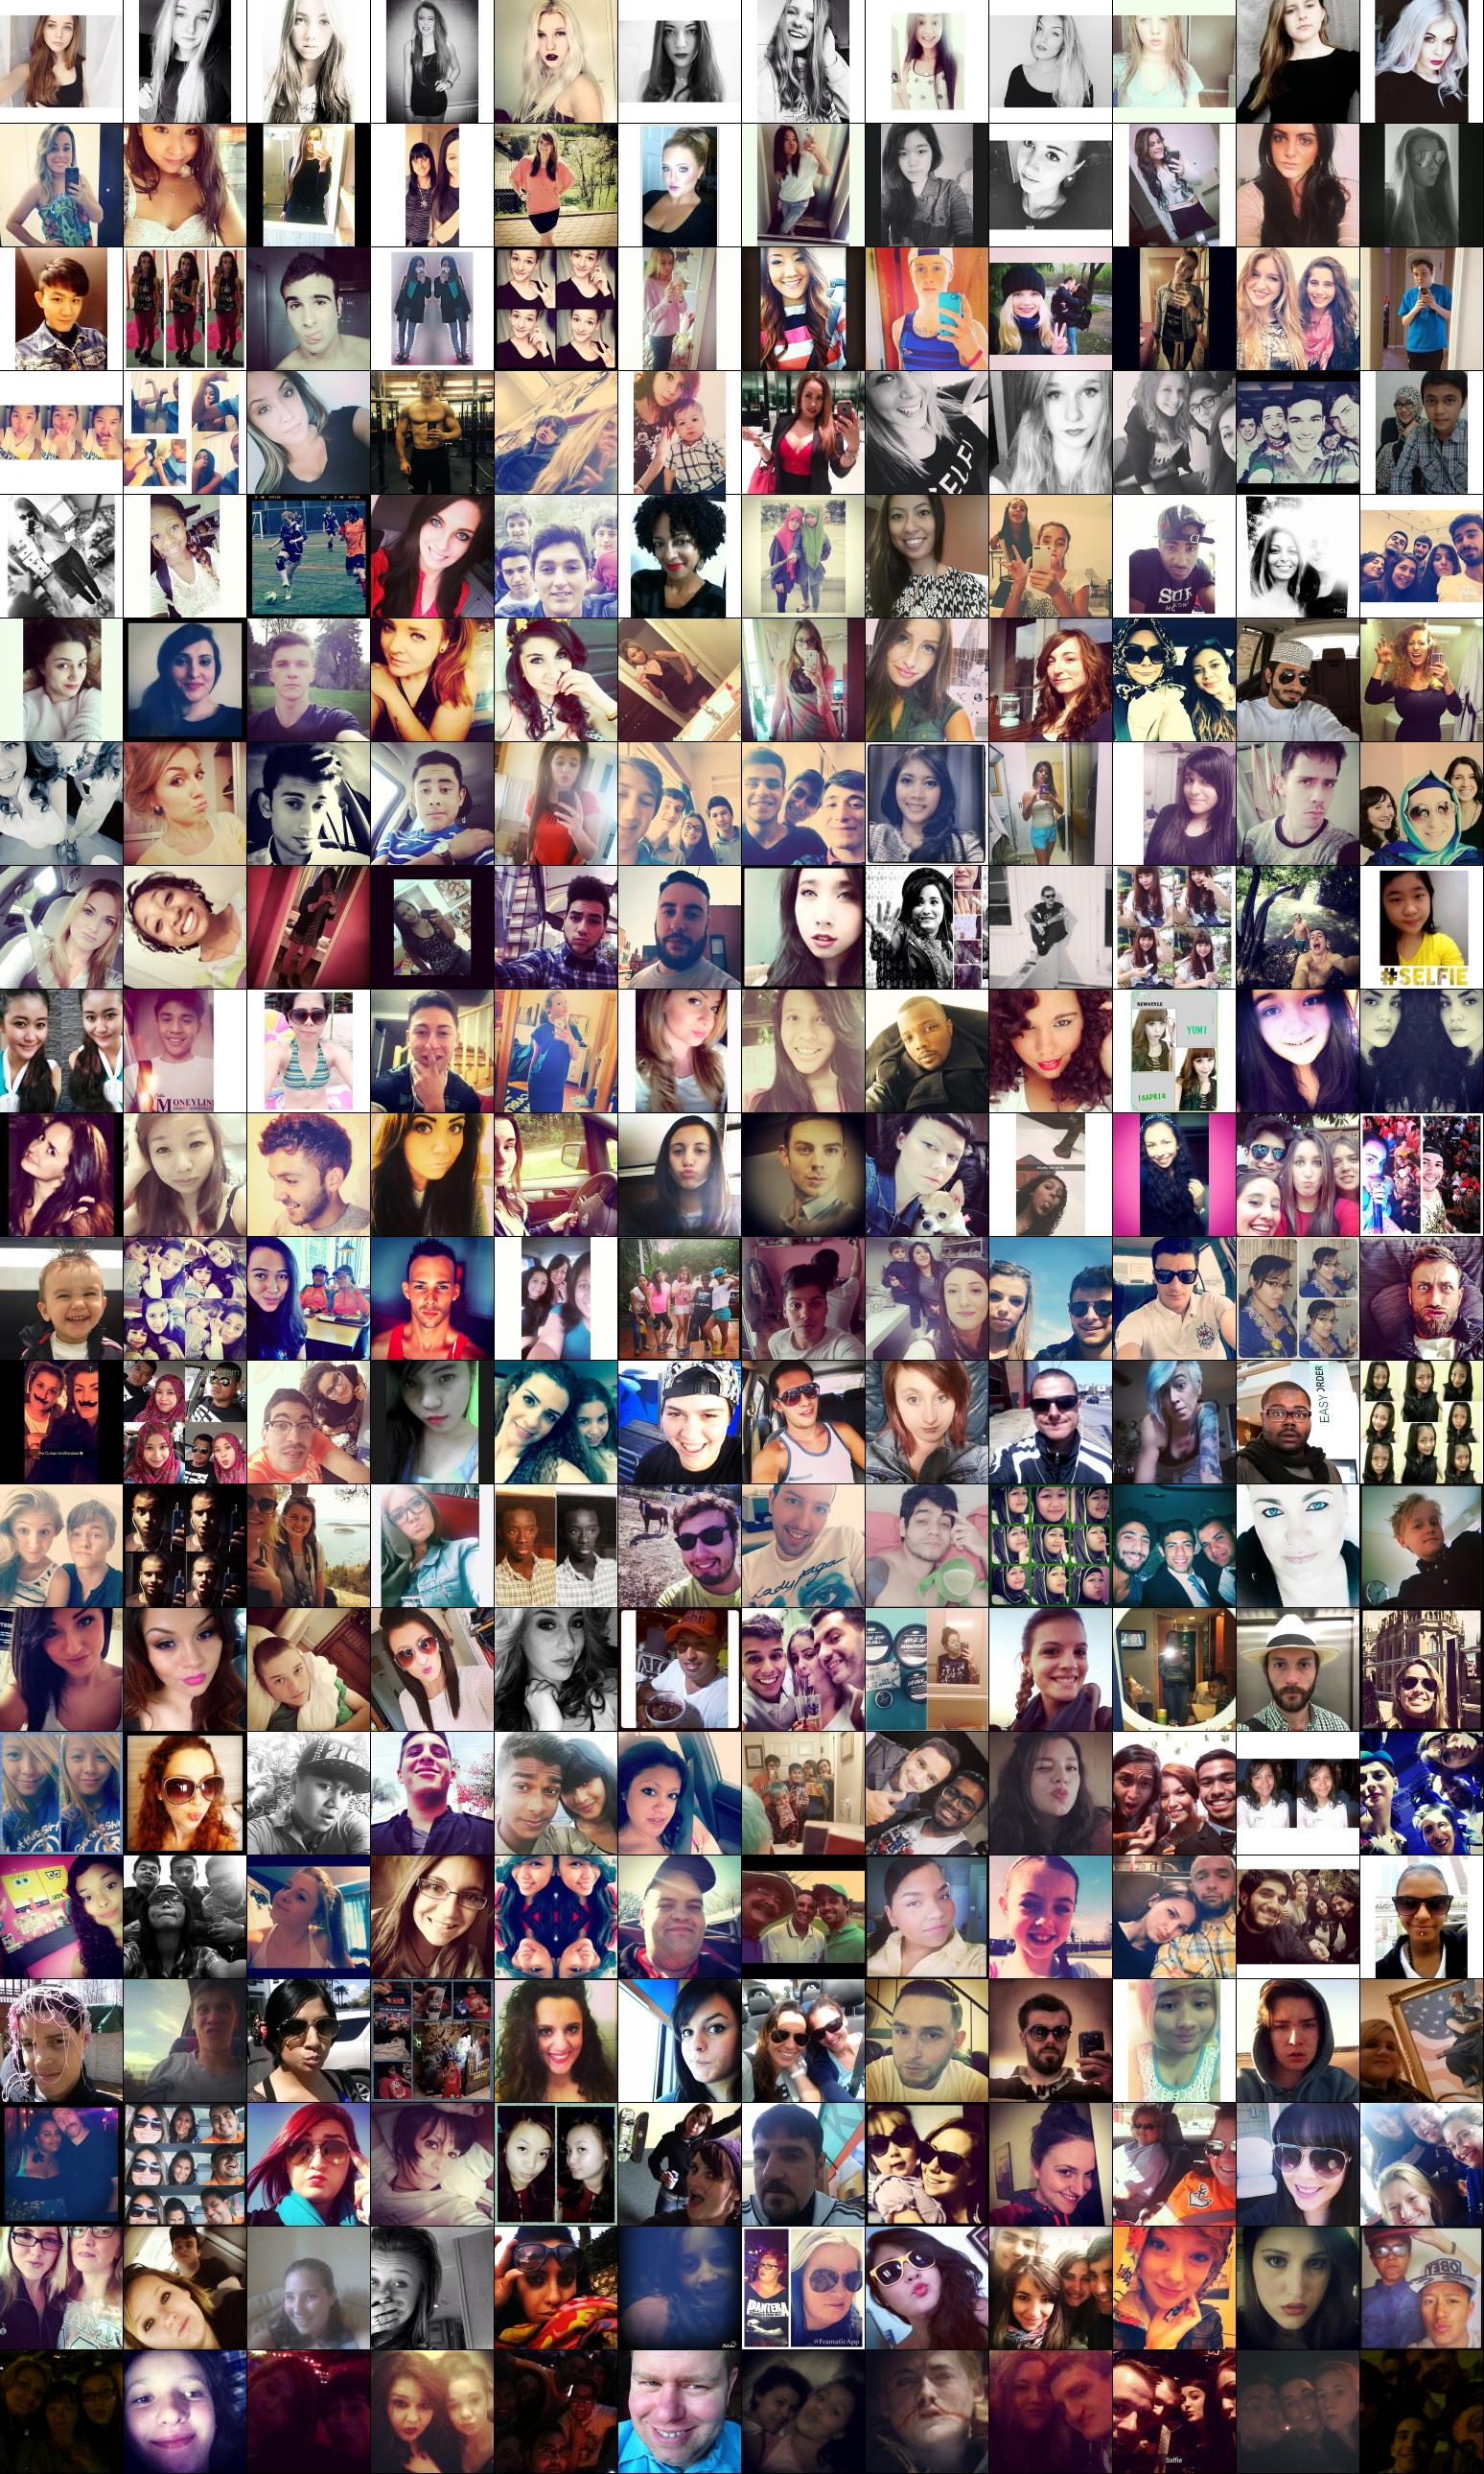
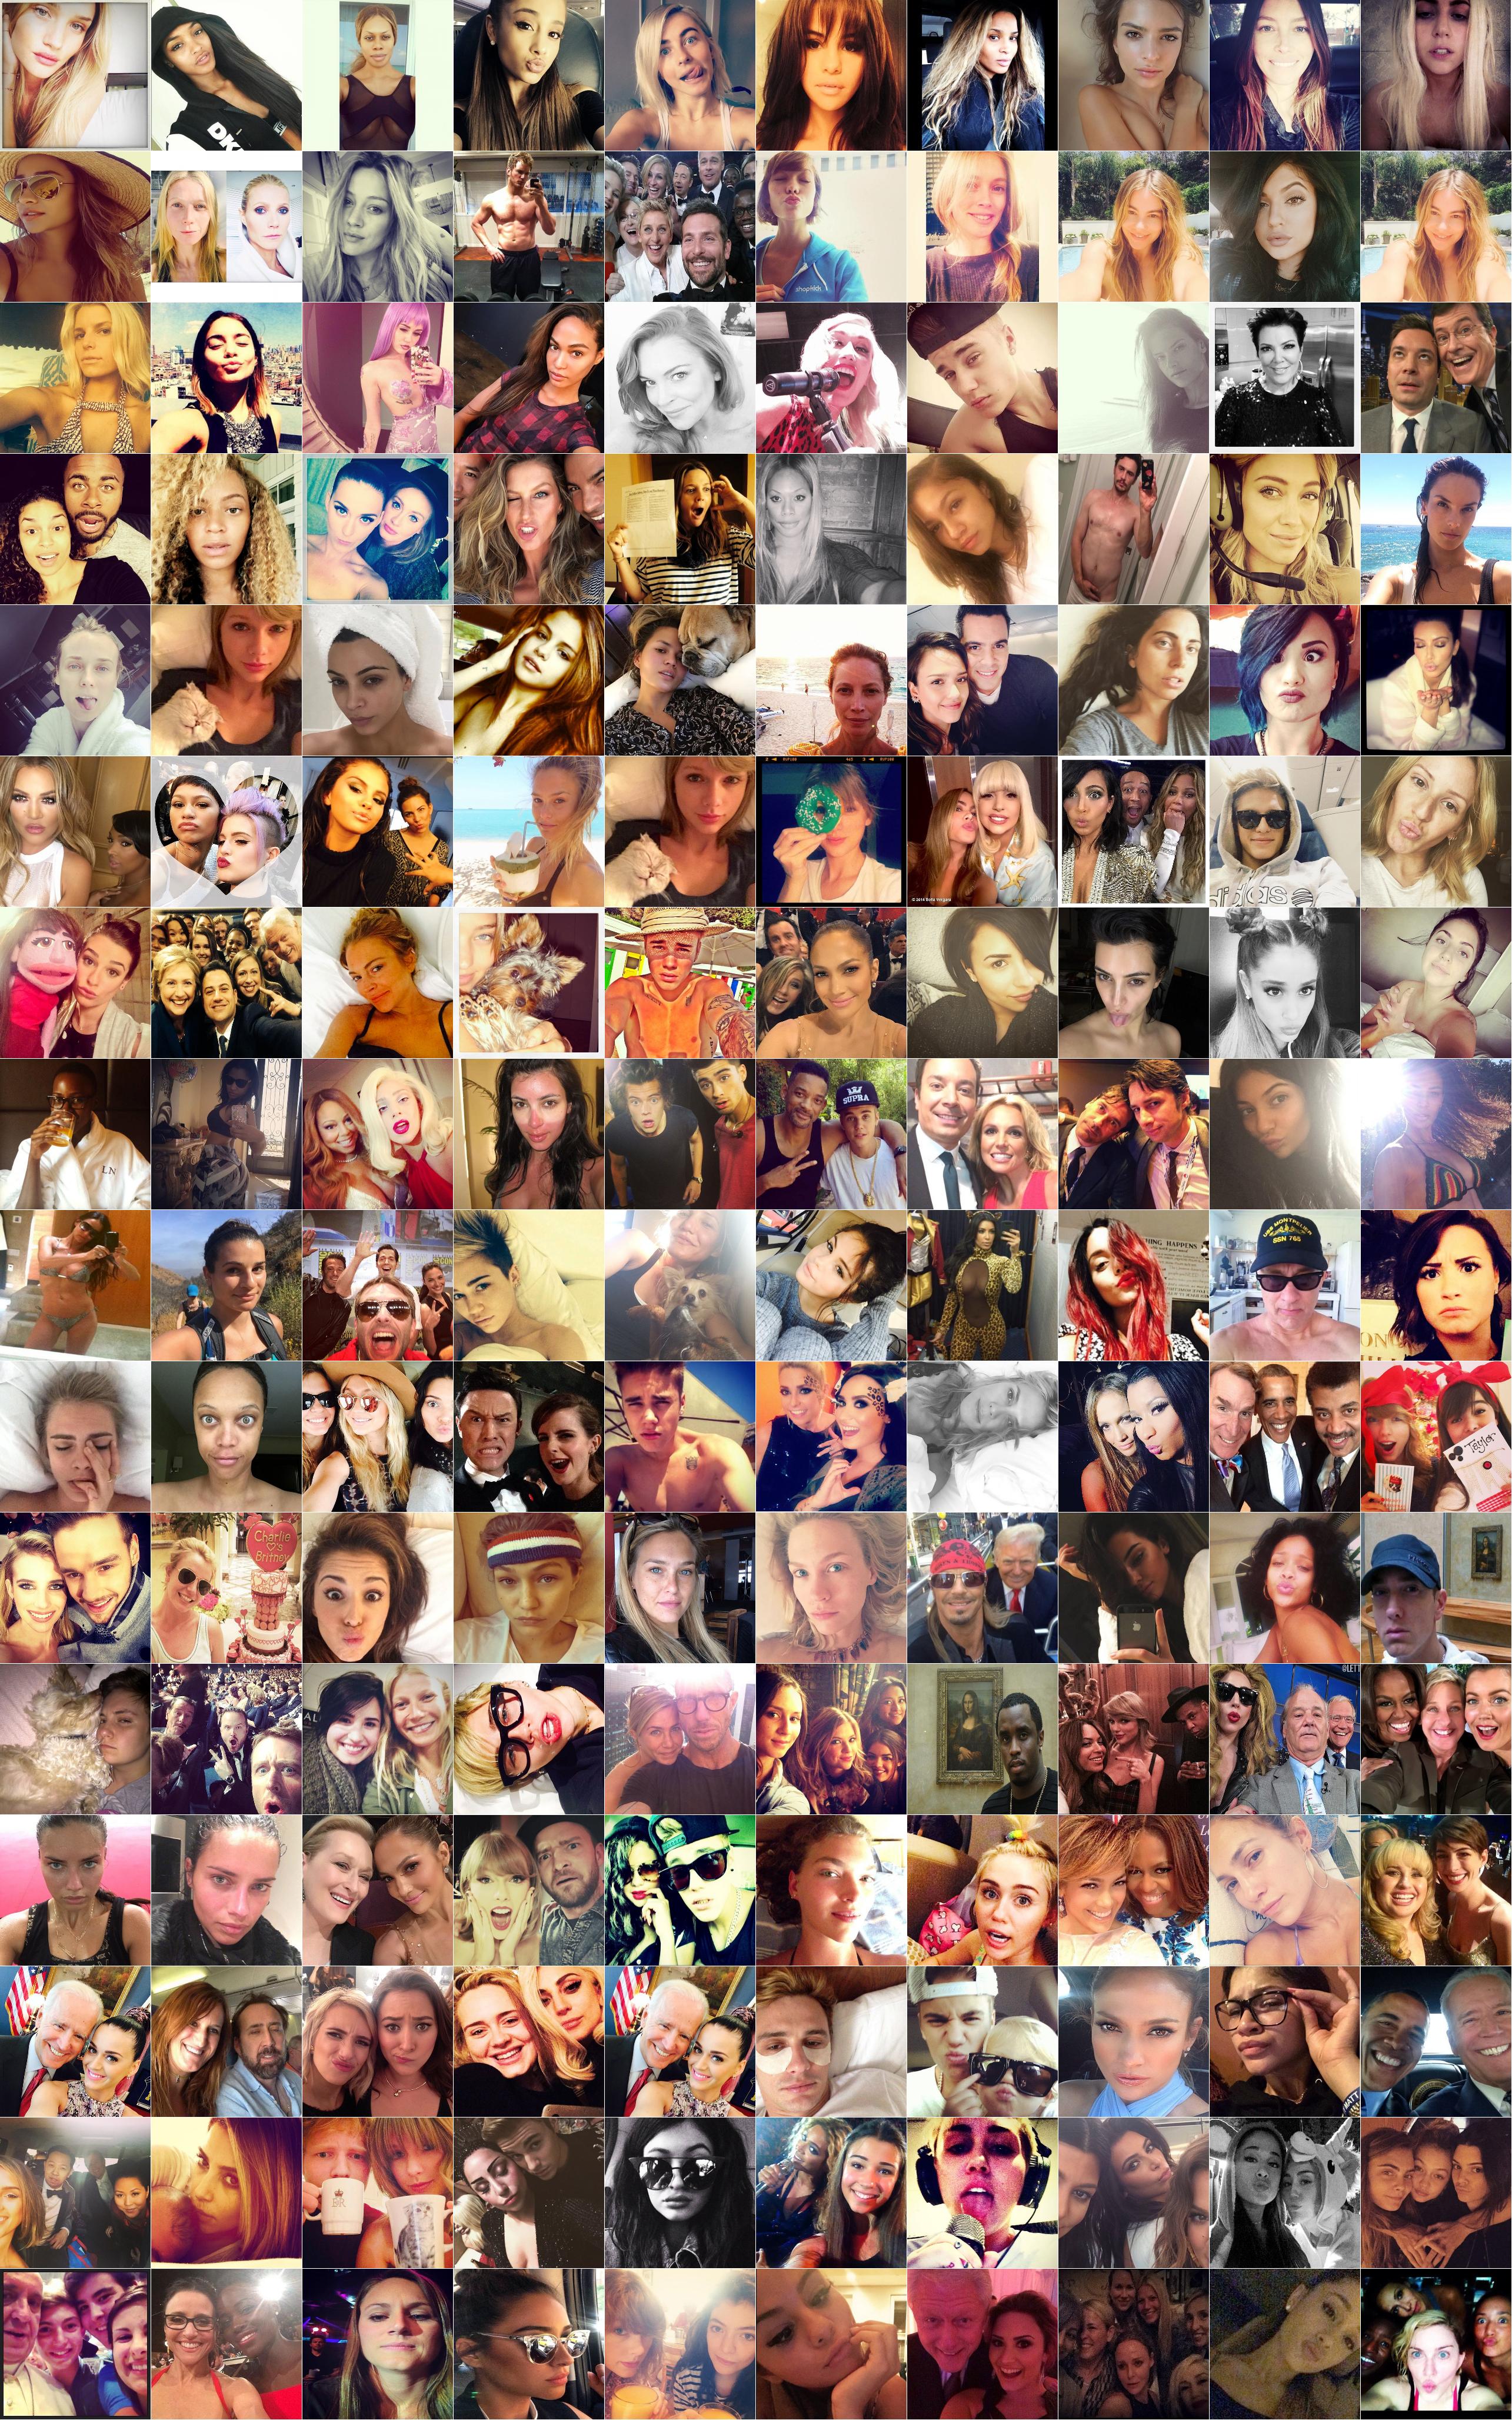
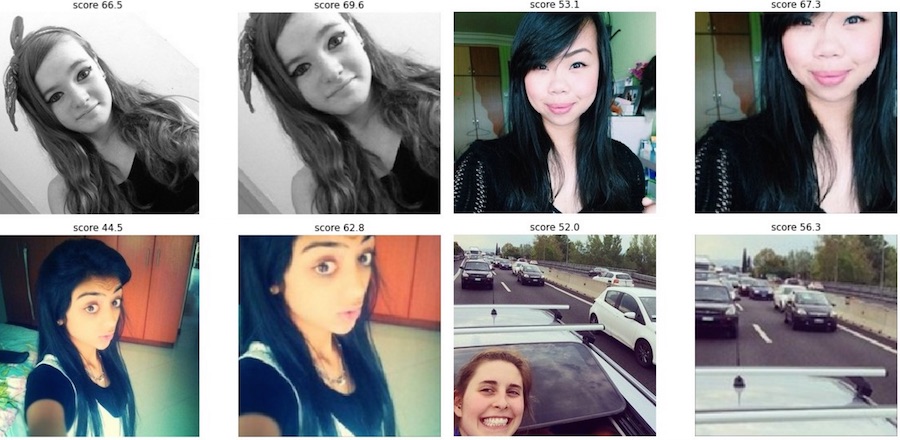
That was interesting. Lets now pull up the top 100 selfies (out of 50,000), according to the ConvNet:
If you’d like to see more here is a link to top 1000 selfies (3.5MB). Are you noticing a pattern in what the ConvNet has likely learned to look for? A few patterns stand out for me, and if you notice anything else I’d be happy to hear about in the comments. To take a good selfie, Do:
- Be female. Women are consistently ranked higher than men. In particular, notice that there is not a single guy in the top 100.
- Face should occupy about 1/3 of the image. Notice that the position and pose of the face is quite consistent among the top images. The face always occupies about 1/3 of the image, is slightly tilted, and is positioned in the center and at the top. Which also brings me to:
- Cut off your forehead. What’s up with that? It looks like a popular strategy, at least for women.
- Show your long hair. Notice the frequent prominence of long strands of hair running down the shoulders.
- Oversaturate the face. Notice the frequent occurrence of over-saturated lighting, which often makes the face look much more uniform and faded out. Related to that,
- Put a filter on it. Black and White photos seem to do quite well, and most of the top images seem to contain some kind of a filter that fades out the image and decreases the contrast.
- Add a border. You will notice a frequent appearance of horizontal/vertical white borders.
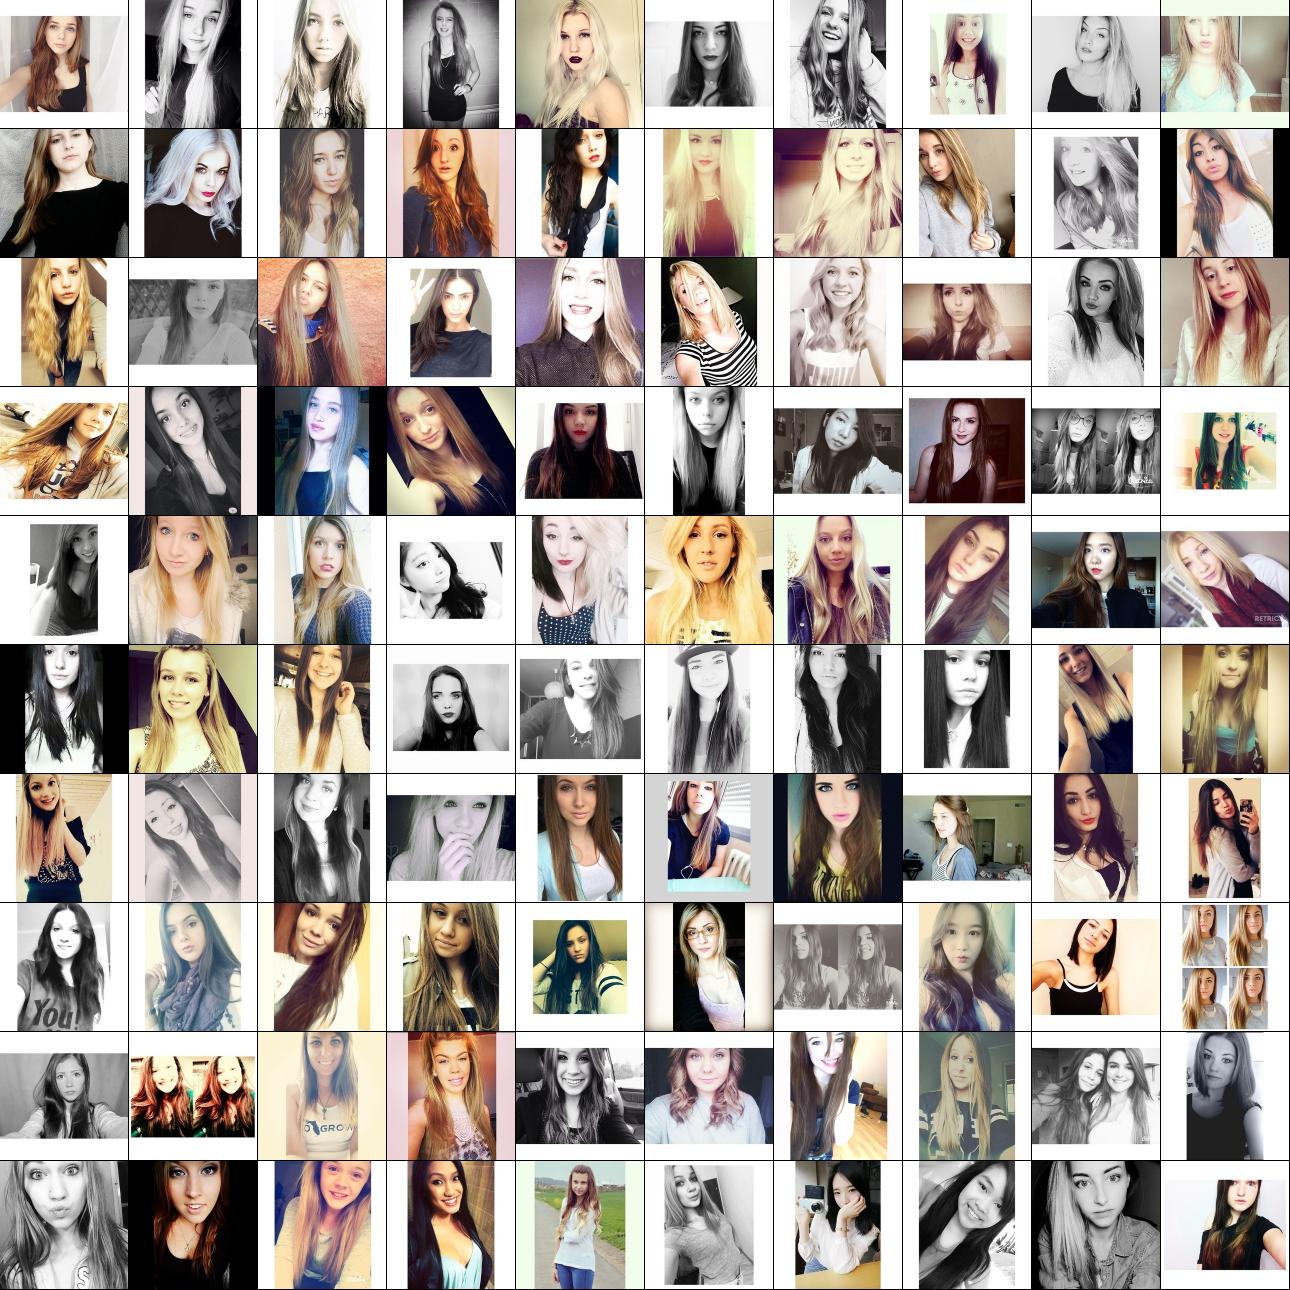
Interestingly, not all of these rules apply to males. I manually went through the top 2000 selfies and picked out the top males, here’s what we get:
In this case we see don’t see any cut off foreheads. Instead, most selfies seem to be a slightly broader shot with head fully in the picture, and shoulders visible. It also looks like many of them have a fancy hair style with slightly longer hair combed upwards. However, we still do see the prominance of faded facial features.
Lets also look at some of the worst selfies, which the ConvNet is quite certain would not receive a lot of likes. I am showing the images in a much smaller and less identifiable format because my intention is for us to learn about the broad patterns that decrease the selfie’s quality, not to shine light on people who happened to take a bad selfie. Here they are:
Even at this small resolution some patterns clearly emerge. Don’t:
- Take selfies in low lighting. Very consistently, darker photos (which usually include much more noise as well) are ranked very low by the ConvNet.
- Frame your head too large. Presumably no one wants to see such an up-close view.
- Take group shots. It’s fun to take selfies with your friends but this seems to not work very well. Keep it simple and take up all the space yourself. But not too much space.
As a last point, note that a good portion of the variability between what makes a good or bad selfies can be explained by the style of the image, as opposed to the raw attractiveness of the person. Also, with some relief, it seems that the best selfies do not seem to be the ones that show the most skin. I was quite concerned for a moment there that my fancy 140-million ConvNet would turn out to be a simple amount-of-skin-texture-counter.
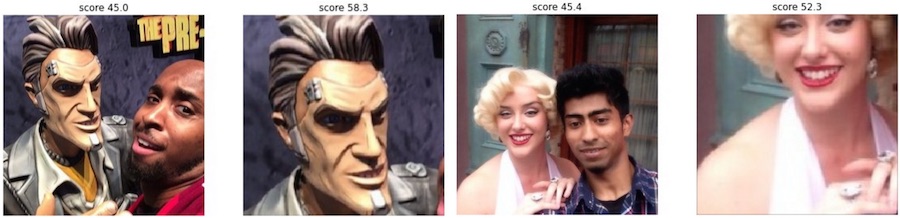
Celebrities. As a last fun experiment, I tried to run the ConvNet on a few famous celebrity selfies, and sorted the results with the continuum visualization, where the best selfies are on the top and the ConvNet score decreases to the right and then towards the bottom:
Amusingly, note that the general rule of thumb we observed before (no group photos) is broken with the famous group selfie of Ellen DeGeneres and others from the Oscars, yet the ConvNet thinks this is actually a very good selfie, placing it on the 2nd row! Nice! :)
Another one of our rules of thumb (no males) is confidently defied by Chris Pratt’s body (also 2nd row), and honorable mentions go to Justin Beiber’s raised eyebrows and Stephen Collbert / Jimmy Fallon duo (3rd row). James Franco’s selfie shows quite a lot more skin than Chris’, but the ConvNet is not very impressed (4th row). Neither was I.
Lastly, notice again the importance of style. There are several uncontroversially-good-looking people who still appear on the bottom of the list, due to bad framing (e.g. head too large possibly for J Lo), bad lighting, etc.
Exploring the #selfie space
Another fun visualization we can try is to lay out the selfies with t-SNE. t-SNE is a wonderful algorithm that I like to run on nearly anything I can because it’s both very general and very effective - it takes some number of things (e.g. images in our case) and lays them out in such way that nearby things are similar. You can in fact lay out many things with t-SNE, such as Netflix movies, words, Twitter profiles, ImageNet images, or really anything where you have some number of things and a way of comparing how similar two things are. In our case we will lay out selfies based on how similar the ConvNet perceives them. In technical terms, we are doing this based on L2 norms of the fc7 activations in the last fully-connected layer. Here is the visualization:
You can see that selfies cluster in some fun ways: we have group selfies on top left, a cluster of selfies with sunglasses/glasses in middle left, closeups bottom left, a lot of mirror full-body shots top right, etc. Well, I guess that was kind of fun.
Finding the Optimal Crop for a selfie
Another fun experiment we can run is to use the ConvNet to automatically find the best selfie crops. That is, we will take an image, randomly try out many different possible crops and then select the one that the ConvNet thinks looks best. Below are four examples of the process, where I show the original selfies on the left, and the ConvNet-cropped selfies on the right:
Notice that the ConvNet likes to make the head take up about 1/3 of the image, and chops off the forehead. Amusingly, in the image on the bottom right the ConvNet decided to get rid of the “self” part of selfie, entirely missing the point :) You can find many more fun examples of these “rude” crops:
Before any of the more advanced users ask: Yes, I did try to insert a Spatial Transformer layer right after the image and before the ConvNet. Then I backpropped into the 6 parameters that define an arbitrary affine crop. Unfortunately I could not get this to work well - the optimization would sometimes get stuck, or drift around somewhat randomly. I also tried constraining the transform to scale/translation but this did not help. Luckily, when your transform has 3 bounded parameters then we can afford to perform global search (as seen above).
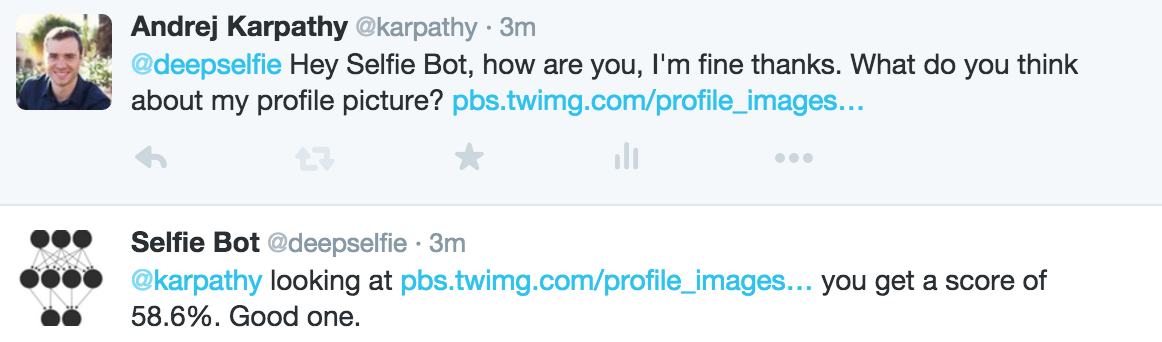
How good is yours?
Curious about what the network thinks of your selfies? I’ve packaged the network into a Twitter bot so that you can easily find out. (The bot turns out to be onyl ~150 lines of Python, including all Caffe/Tweepy code). Attach your image to a tweet (or include a link) and mention the bot @deepselfie anywhere in the tweet. The bot will take a look at your selfie and then pitch in with its opinion! For best results link to a square image, otherwise the bot will have to squish it to a square, which deteriorates the results. The bot should reply within a minute or something went wrong (try again later).
Before anyone asks, I also tried to port a smaller version of this ConvNet to run on iOS so you could enjoy real-time feedback while taking your selfies, but this turned out to be quite involved for a quick side project - e.g. I first tried to write my own fragment shaders since there is no CUDA-like support, then looked at some threaded CPU-only versions, but I couldn’t get it to work nicely and in real time. And I do have real work to do.
Conclusion
I hope I’ve given you a taste of how powerful Convolutional Neural Networks are. You give them example images with some labels, they learn to recognize those things automatically, and it all works very well and is very fast (at least at test time, once it’s trained). Of course, we’ve only barely scratched the surface - ConvNets are used as a basic building block in many Neural Networks, not just to classify images/videos but also to segment, detect, and describe, both in the cloud or in robots.
If you’d liked to learn more, the best place to start for a beginner right now is probably Michael Nielsen’s tutorials. From there I would encourage you to first look at Andrew Ng’s Coursera class, and then next I would go through course notes/assignments for CS231n. This is a class specifically on ConvNets that I taught together with Fei-Fei at Stanford last Winter quarter. We will also be offering the class again starting January 2016 and you’re free to follow along. For more advanced material I would look into Hugo Larochelle’s Neural Networks class or the Deep Learning book currently being written by Yoshua Bengio, Ian Goodfellow and Aaron Courville.
Of course you’ll learn much more by doing than by reading, so I’d recommend that you play with 101 Kaggle Challenges, or that you develop your own side projects, in which case I warmly recommend that you not only do but also write about it, and post it places for all of us to read, for example on /r/machinelearning which has accumulated a nice community. As for recommended tools, the three common options right now are:
- Caffe (C++, Python/Matlab wrappers), which I used in this post. If you’re looking to do basic Image Classification then Caffe is the easiest way to go, in many cases requiring you to write no code, just invoking included scripts.
- Theano-based Deep Learning libraries (Python) such as Keras or Lasagne, which allow more flexibility.
- Torch (C++, Lua), which is what I currently use in my research. I’d recommend Torch for the most advanced users, as it offers a lot of freedom, flexibility, speed, all with quite simple abstractions.
Some other slightly newer/less proven but promising libraries include Nervana’s Neon, CGT, or Mocha in Julia.
Lastly, there are a few companies out there who aspire to bring Deep Learning to the masses. One example is MetaMind, who offer web interface that allows you to drag and drop images and train a ConvNet (they handle all of the details in the cloud). MetaMind and Clarifai also offer ConvNet REST APIs.
That’s it, see you next time!